Sample
To perform a quick test on whether the setup is done, follow the steps below,
- Click Skill name to open dialog designer.
- On the top-right corner of the canvas, you can see the Push Chatbot Configuration icon (
 ). This will push the current dialog design to the chatbot web service.
 - On the bottom-left corner of AI Studio UI, you can see the Test Dialogs icon (
 ). This will open up the web chat window on the UI, from where you can test the dialogs during development.
 - The connection details will already be auto-populated in the web chat dialog.
Test Dialogs Details
Bot Domain: http://localhost:3978/v3/directline
Bot Token: secret
Username: user_1 - Click the Connect button. Web chat is connected and ready to be tested.
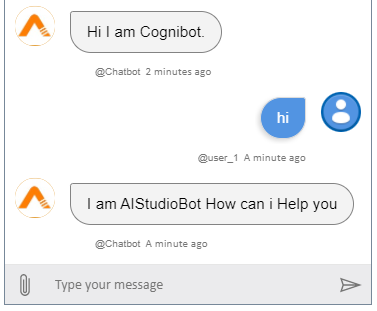
- You can type hi and according to the dialog design, the chatbot will respond.
Let’s get into the details of some sample dialogs.
Product
This dialog will take two numbers from the user and calculate the product of those numbers, using regex trigger and python function-based action.
You will see the trigger as (Regex ) - prod.* for the dialog, which means that if the user enters anything with the word prod in the chatbot this dialog will be triggered. Next, in dialog elements, we have the interaction flow after the dialog is triggered. Starting with Input n1, it will show the user a message Enter Number1 and wait for the response. This will in turn be stored in variable n1 and the scope is Dialog. Similarly, Input n2, will ask the user for Enter Number2 and the response will be stored in variable n2 and scope is Dialog.
Once the numbers are received from the user, the next step is to calculate the product. For this we have used Action with type Python and function demo/compute_product.
To make python functions available for actions follow the steps given below:
- From File Explorer, go to folder <AI_STUDIO_PATH> -> aistudio-packages -> Chatbot-Webservice -> cognibot -> aistudiobot -> aistudio -> functions -> python.
- You can see a demo.py file here, which contains function compute_product.
demo.py\compute_product
async def compute_product(context: TurnContext, dialog_id: str, aistudio_conv_state: AIStudioConvState, aistudio_user_state: AIStudioUserState):
    dialog_dict = aistudio_conv_state.get_dialog_params().get(dialog_id, {})
    n1 = float(dialog_dict.get('n1', 1))
    n2 = float(dialog_dict.get('n2', 1))
aistudio_conv_state.add_dialog_input_as_param(dialog_id, "product", str(n1*n2)) - As you can see the ids specified in Input for each number n1 and n2 are used here directly. The product is computed and stored for the particular dialog, variable
product.
To show the product result back to the user, we have used Message: Product is ${dialog.product.product}. The result is basically accessed as dialog.<dialog_name>.<key_from_function> as the scope is Dialog. Also, note that the variables cannot be accessed after the dialog flow has ended.
- Custom python functions can be added under the Extension submenu -> custom -> functions->python. To know more about custom python functions, click here (link needs to be added).
Now, these functions will be visible under the path Extension submenu -> custom -> functions -> python. A detailed example is explained in is_prime dialog.
it_ops
This dialog is an example of branching based on the user choice and to fulfill the request we would be invoking an AutomationEdge Workflow.
You will see the trigger as ( Regex ) - ops.* for the dialog, which means that if the user enters anything with the word ops in the chatbot this dialog will be triggered. In Dialog Elements, first, we have an Input with type Choice where the four options are provided in a comma-separated list Create Ticket, Create Ticket with Attachment, Ticket Details, Get Tickets. Depending on the user's choice, Branch will redirect the further flow to the target dialog.
We will go through two of the options,
create_ticket
On selection of the Create Ticket option, the user will be prompted for the description of the issue via Input. The response will be stored in variable desc and the scope is Dialog. On receiving the description from the user, we need to invoke the relevant AutomationEdge Workflow. For this we have used Action with type AE Workflow and workflow Create_Incident_ServiceNow. This workflow has four mandatory runtime parameters,
| Name | Value | Type | Description |
|---|---|---|---|
| shortDesc | ${dialog.create_ticket.desc} | Input | This is the user input accepted in variable desc |
| userName | Kevin John | Input | This is the full name of the Service Now user through which the incident will be created |
| chatBotEndPoint | default_workflow_functions/get_chatbot_URL | Function | The chatbot web service URL where the workflow response has to be sent back |
| additionalInfo | default_workflow_functions/get_additional_info | Function | This contains information which chatbot web service needs to send the correct response to the correct user and web channel. |
For Workflow Parameters -> Type -> Function, we have provided two out-of-the-box functions default_workflow_functions/get_chatbot_URL and default_workflow_functions/get_additional_info. This is so that the users do not have to enter values that can be fetched by the system itself for processing the workflow response.
Once the ticket is created and the AutomationEdge workflow completes successfully, the response is sent back to the chatbot via the value in chatBotEndPoint with the additional information in additionalInfo. The result is processed and shown to the user, as Your Ticket has been created with Ticket ID <Incident-Number-from-ServiceNow>.
You can check the Requests on AutomationEdge with the following details,
URL: https://t4.automationedge.com
Username: john.doe
Password: J0hn!D0e
Also, the assigned workflows to your AutomationEdge user can be viewed in Workflow -> Workflow List.
create_ticket_with_attachment
On selection of the Create Ticket with Attachment option, the user will be prompted for the description of the issue via Input. The response will be stored in variable desc and the scope is Dialog. On receiving the description from the user, next, we will ask the user to upload the issue-related file. This is done using File, the file is stored in variable issue_file and scope is Dialog. In the chatbot the file can be browsed/selected using the Upload File icon ( ![]() ).
).
- Maximum file attachment size is 5000 Kb.
- File extensions are HTML, JSON, and txt.
Invoke an AutomationEdge Workflow, with Action with type AE Workflow and workflow Create_Incident_ServiceNow_WithAttachment. This workflow has five mandatory runtime parameters,
| Name | Value | Type | Description |
|---|---|---|---|
| shortDesc | ${dialog.create_ticket.desc} | Input | This is the user input accepted in variable desc |
| File_Attachment | ${dialog.create_ticket_with_attachment.issue_file} | File | This is the file to attach while raising the ticket in Service Now, accepted in variable issue_file |
| userName | Kevin John | Input | This is the full name of the Service Now user through which the incident will be created |
| chatBotEndPoint | default_workflow_functions/get_chatbot_URL | Function | The chatbot web service URL where the workflow response has to be sent back |
| additionalInfo | default_workflow_functions/get_additional_info | Function | This contains information which chatbot web service needs to send the correct response to the correct user and web channel. |
Once the ticket is created and the AutomationEdge workflow completes successfully, the response is sent back to the chatbot via the value in chatBotEndPoint with the additional information in additionalInfo. The result is processed and shown to the user, as Your Ticket has been created with Ticket ID <Incident-Number-from-ServiceNow>.
You might have noticed that on the canvas, create_ticket has the number [ 5 ] assigned and create_ticket_with_attachment has no number.
When a trigger is added to any dialog, an order number is added by default. If a trigger is not added to the dialog, it can be invoked only through a branch (if any) and not directly.
So in our sample, create_ticket will be invoked if the user inputs ops -> Create Ticket or Create Ticket. And create_ticket_with_attachment only through ops -> Create Ticket with Attachment.
On rearranging the dialog order in the left panel Dialogs using the_Move_ icon ( ![]() ), the numbers will change accordingly.
), the numbers will change accordingly.
Greet User
These dialogs will demonstrate the User state.
set_language
This dialog will ask the user to select a language preference.
You will see the trigger as ( Regex ) - lang.* for the dialog, which means that if the user enters anything with the word lang in the chatbot this dialog will be triggered. In dialog elements, we have an Input with type Choice with options English, German, French, Portuguese. The user selection will be stored in variable lang and scope User.
greet_user
This dialog will greet the user in the language selected in the earlier dialog.
You will see the trigger as (Regex) - greet.* for the dialog, which means that if the user enters anything with the word greet in the chatbot this dialog will be triggered. In dialog elements, we have an Action with type Python and function demo/set_greeting. The predefined function is under <AI_STUDIO_PATH> -> aistudio-packages -> Chatbot-Webservice -> cognibot -> aistudiobot -> aistudio -> functions -> python -> demo.py.
async def set_greeting(context: TurnContext, dialog_id: str, aistudio_conv_state: AIStudioConvState, aistudio_user_state: AIStudioUserState):
    user_params = aistudio_user_state.get_user_params()
    lang = user_params.get("lang", "English")
    greeting = {
        "English": "Hello, how are you",
        "German": "Hallo, Wie geht es?",
        "French": "Bonjour, Comment ca va?",
        "Portuguese": "Olá, como vai?"
    }
    aistudio_user_state.add_user_input_as_param("greeting", greeting.get(lang))
The language preference of the user set in the previous dialog is fetched lang = user_params["lang"]. Accordingly, the greeting is fetched and stored in variable greeting with scope User. Back to dialog elements, show the greeting to the user with Message: ${user.greeting}.
The advantage of the User state is that even if the chatbot is restarted the values are retained. So anytime now the user types greet in the chatbot, it will respond in the same language.
is_prime
We will use a custom python file and function to check if the given number is prime or not. This function will be invoked by the dialog designer.
Python
- Paste the is_prime.py file which contains python code under custom -> functions -> python.
- Add the below contents to the file,
from botbuilder.core import ConversationState, TurnContext

from aistudiobot.aistudio.dialog.state import (
    AIStudioConvState, AIStudioUserState,
)

async def check_number_is_prime(context: TurnContext, dialog_id: str, aistudio_conv_state: AIStudioConvState, aistudio_user_state: AIStudioUserState):
  dialog_dict = aistudio_conv_state.get_dialog_params()[dialog_id]
  # define variables
  flag = False
  valid = "False"
  try:
    number = int(dialog_dict['number'])
    # prime numbers are greater than 1
    if number > 1:
      valid = "True"
      # check for factors
      for i in range(2, number):
        if (number % i) == 0:
          # if the factor is found, set valid to True
          flag = True
          # break out of loop
          break
      # check if valid is True
      if flag:
        message = str(number)+" is not a prime number"
      else:
        message = str(number)+" is a prime number"
    else:
      message = "Please provide a number greater than 1"
  except ValueError:
    message = "Please provide an integer"

  # Below lines add 'valid' and 'message' as Dialog State parameters which can be accessed as,
  # ${dialog.is_prime_dialog.valid} and ${dialog.is_prime_dialog.message} respectively in Dialog Designer
  aistudio_conv_state.add_dialog_input_as_param(dialog_id, "valid", valid)
  aistudio_conv_state.add_dialog_input_as_param(dialog_id, "message", message)
- To sync the changes of custom code to a chatbot, follow the steps given below:
- In case of cloud release, go to the provisioning submenu and click Redeploy option.
- In case of an on-prem release, restart the Chatbot webservice.
AI Studio Dialog Designer
- Add a new dialog using Add icon (
 ).
). - Enter Dialog Name as is_prime_dialog
- Click this new dialog, add Trigger with Type
(Regex )and Regexprime. Click the tick icon. - You need to create the following dialog elements,
| Process Flow | Dialog Element | Details |
|---|---|---|
Accept a number from the user and store in variable number in scope Dialog | Input |
|
| Invoke the python function which you wrote | Action |
|
Show the user the message from the python function, which is accessible in variable message in scope Dialog | Message | Message : ${dialog.is_prime_dialog.message} |
In case of any error the variable valid is set to False. For this case, route the flow to the same dialog again. | Branch |
|
As we have created a branch to itself (same dialog), a self-loop is created on the canvas as below,

Test Dialog
- Let’s test the dialog you created. Click the Test Dialogs icon ( ).
- Enter the connection details and connect.
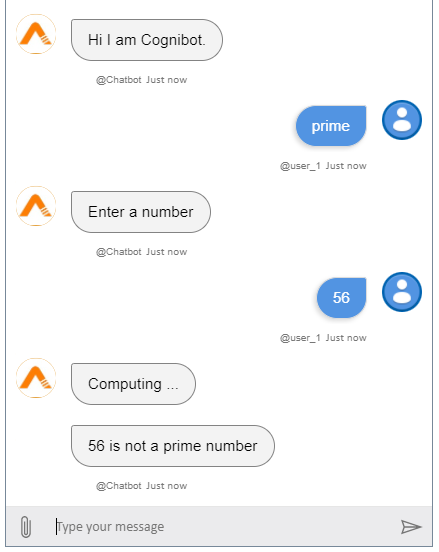
- The trigger for the dialog is prime, so type that into the chatbot.
- Type in the number when prompted to Enter a number.
- Message Computing ... is shown when the python function is being invoked.
- The python function response will be shown as per the number entered.
- If you enter say abc as the input, you will be shown the error message Please provide an integer. Enter a number will be prompted again. This happens because of the self-loop created in dialog design.
You can try out different variations in the input value to see how the validations are written work.