Overview
Overview subtab consists of the basic configurations and operations for the Cognibot project.
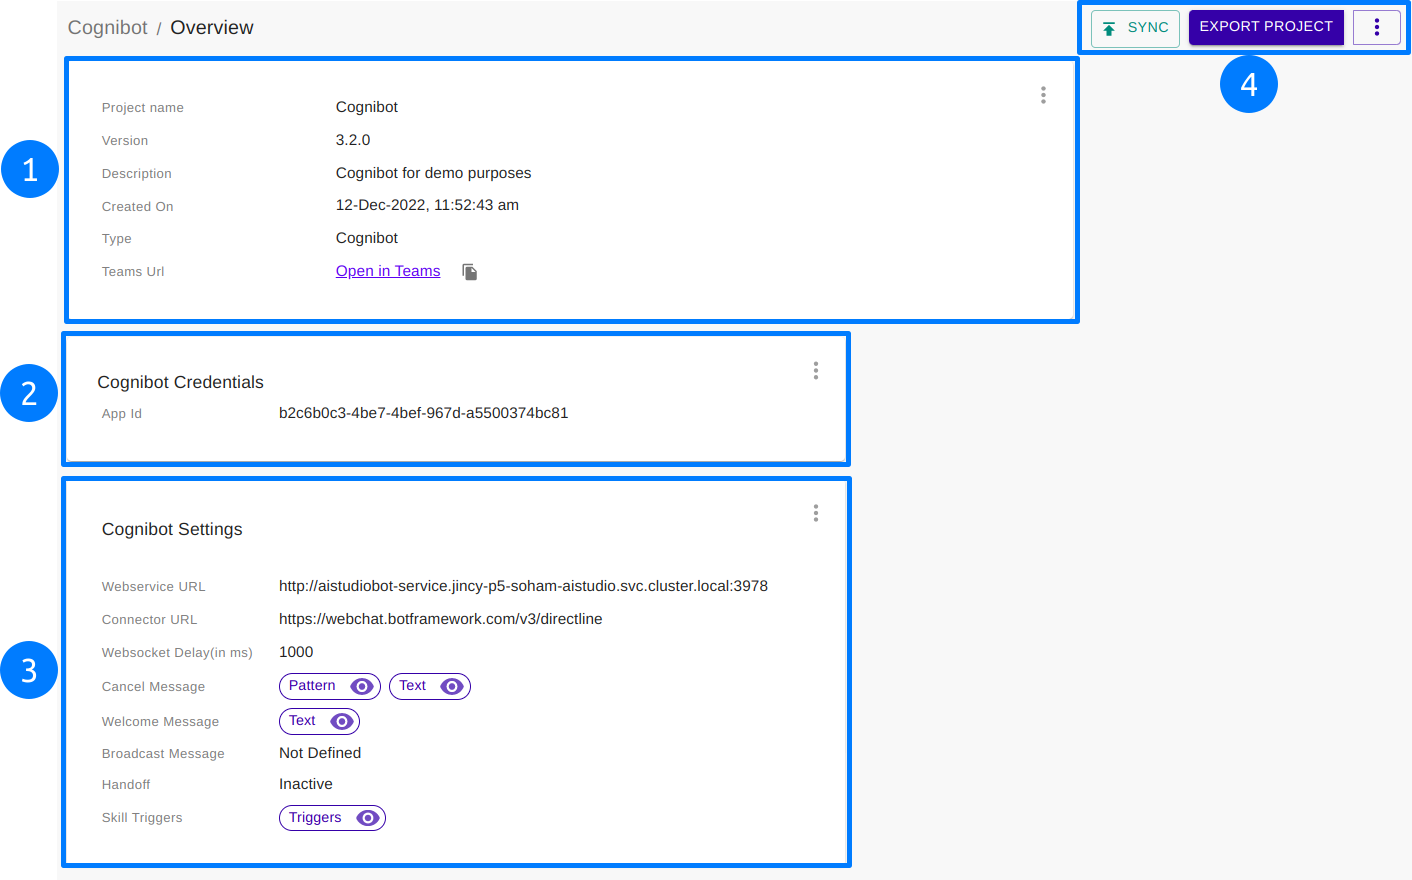
- Project details like Project Name, Version, Description, Creation date, and Project Type.
info
For Cloud instance, after successful chatbot deployment, this section also displays one of the below details,
- Teams Url: The chatbot can be directly opened in the Microsoft Teams application. This information is available only when the Create Azure Bot option is enabled during deployment.
- Messaging Endpoint: The messaging endpoint of the chatbot. This information is available only when the Create Azure Bot option is disabled during deployment. For the Azure Bot to connect this chatbot, configure the messaging endpoint in Azure Portal.
Click three dots ( ![]() ) in this section for more options. These options are,
) in this section for more options. These options are,
- Edit Project: The project name and description can be modified.
- Delete Project: The project will be deleted permanently along with the dialogs and extension.
note
For Cloud instance, the deployment also will be deleted when the project is deleted.
- Cognibot Credentials has a unique App ID and Password which is mandatory for AI Studio to connect with the Chatbot webservice.
To modify the App Password,- Click three dots (
 ).
). - Click Edit Credentials.
- Click Generate Password.
- Click Update.
- Click three dots (
caution
After updating the App Password, restart the Chatbot webservice.
For On-Premises instance, follow Chatbot webservice installation (Windows, Linux).
For Cloud instance, Redeploy the Chatbot.
- Cognibot Settings defines all the basic settings for the chatbot. To edit these settings, click three dots ( ) -> Edit Settings.
The fields available are explained below,- Webservice URL: URL where the chatbot is running.
- Connector URL: Webchat connector service URL. In the case of Azure Bot, the value would be https://webchat.botframework.com/v3/directline.
- Token: Token to connect to the chatbot. The values differ according to the connector,
- AE Connector: the value is secret.
- Azure Bot: Add the Web Chat channel to the Azure Bot and get the value of the webchat token from Azure Portal.
- Speech Subscription Key: Key to connect to Azure Cognitive Services for speech-to-text ability in webchat.
- Websocket Delay (in ms): Time in milliseconds given to setup the connection with the connector (AE Connector/Azure Bot).
- Cancel Message: The message to be shown when the chatbot user cancels the ongoing context. The message can be either a Text or an Adaptive Card.
The cancel event is triggered only when one of the keywords configured in Cancel Pattern is entered by the chatbot user. The Cancel Pattern can have multiple comma-separated keywords. - Welcome Message: The message to be shown when a user connects to the chatbot. The message can be either a Text or an Adaptive Card. Also, this can be enabled or disabled according to the requirement.
- Broadcast Message: The message to be shown when a user connects to the bot only during a certain time duration. You can define a start and end time for the broadcast message to be displayed. The message can be either a Text or an Adaptive Card. Also, this can be enabled or disabled according to the requirement.
- Handoff: Project-level setting for human handoff. The human handoff is initiated only when one of the keywords configured in Handoff Triggers is entered by the chatbot user. The Handoff Triggers can have multiple comma-separated keywords.
The Handoff Agents are Project-level agents who can assist the chatbot user with any skill.
Also, this can be enabled or disabled according to the requirement. - Skill Triggers: In case the project has multiple skills, the keywords in Switch Skill Triggers are used to switch skills. When the chatbot enters any one of these keywords, a Card with the available skills is shown to choose from. The context will then be switched based on the selection.
- Sync: Updates the Chatbot webservice with all the settings and configuration made in the project.
Export: Exports the entire project to a zip file. This zip file can be imported to any AI Studio instance.
Click three dots ( ) for the following options,
Download Webchat: Downloads the webchat component zip. The webchat can be embedded with any application, details are given here
Download Chatbot webservice: Downloads the Chatbot webservice zip. It also gives you the option to include the extension code along with the Chatbot webservice application.Generate sample Analytics: Generates sample conversation data for the chatbot. This is useful to view dashboards and reports. The Chat session count and Duration for data generation can be specified.noteDownload Chatbot webservice option is available only on On-Premises instance
info
For the Cloud instance, the following values are auto-filled on successful deployment.
- Webservice URL
- Connector URL
- Token (only if Create Azure Bot is enabled during deployment)