Action
Action is used to perform different tasks using python functions of AIStudio or AutomationEdge workflows.
Action Dialog Element can be used in various scenarios like:
- Integrate AutomationEdge workflows with a chatbot
- Compute logic depending on the user inputs received
Following is a screenshot of the Action dialog element in its default state:
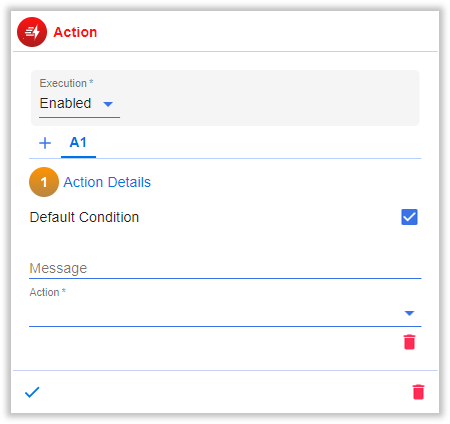
The fields available for Action are given below:
- Execution: Configuration to decide when to execute the respective Dialog Element. The options are as follows,
- Enabled: The Dialog Element will be executed everytime the dialog is executed.
- Disabled: The Dialog Element will never be executed even if the dialog is executed.
- Condition: Depending a on certain condition, the Dialog Element is executed.
infoFor a detailed explanation of Conditions, click here.
By default Action A1 is added. To add more actions, click the plus ( ![]() ) icon.
) icon.
In the case of multiple actions, only the first action that matches the given condition will be executed.
In each action subtab we have the following options,
- Message: The message which would be shown before executing the action.
- Default Condition: If this is selected the Action will always be executed. Uncheck this option to enter the Condition on which you want the Action to execute.
info
For a detailed explanation of Conditions click here.
- Action: Two types of actions are available, Python and AE Workflow. The configuration of the Action Dialog Element depends on this choice.
Python
You can configure to execute a custom python function using Python action. The python functions can be added/modified under Extension -> custom -> functions -> python.
A detailed example on custom python function is provided in Samples
The fields available under the python function are given below:
- Function: You should select the python function to be executed.
- Timeout(in seconds): The maximum amount of time (in seconds) the chatbot would wait for the python function to complete.
This timeout is considered only if the user enters anything in the chatbot when the python function is executing. If there is no input from the chatbot user after the timeout duration specified, the chatbot would wait infinitely for the response until any intervention.
- Wait Message: The message would be shown if the chatbot user enters anything while we are waiting for the execution of the python function.
- Timeout Message: The message would be shown if the chatbot user enters anything and the duration limit given in Timeout(in seconds) has been reached.
AE Workflow
You can seamlessly integrate AutomationEdge workflows into the chatbot using this option.
The attributes to configure for AE Workflow are explained below,
- Connection: Select a connection from the dropdown.
How to create a connection to AutomationEdge is explained here.
- Workflow: Based on the connection selected, the list of workflows is fetched from AutomationEdge. You can select the required workflow from this list.
- Wait for Response: This selection decides whether the chatbot will wait for a response from the AutomationEdge workflow.
- Format Output: When configuring an action in AE workflow, the "Format Output" option allows you to define how the output files are processed.
Workflow Parameters
All the runtime parameters for the AutomationEdge workflow selected need to be configured from the Workflow Parameters subtab.
We support four types of parameters,
- Input: A standard input (static or state variables) value for the runtime parameter. This can be of any type, e.g. number, date, string, etc.
- Function: If you need to compute any value before setting the value of the runtime parameter this option can be used. We provide some in-built functions like get_additional_info and chatbot_url, so you do not need to build these values explicitly. Custom workflow functions are to be written in python and placed under
Extension -> custom -> functions -> workflow. - File: Select this type to send the file to the workflow.
- Credentials: Assign the Credential type object to the runtime parameter.
Wait for Response
This subtab is available when the Action -> Wait for Response option is selected. The chatbot will wait for either reply from workflow or timeout duration whichever is earlier. While the chatbot is waiting, it will display a wait message if the user interacts with the chatbot. Once the user gets a response from workflow, it saves the response JSON in the state variable specified.
The attributes available under Wait for Response are explained below,
- Timeout(in seconds): The maximum amount of time (in seconds) the chatbot would wait for the workflow response.
note
This timeout is considered only if the user enters anything in the chatbot when the workflow is executing. If there is no input from the chatbot user after the timeout duration specified, the chatbot would wait infinitely for the response until any intervention.
- Wait Message: The message would be shown if the chatbot user enters anything while we are waiting for the workflow response.
- Timeout Message: The message would be shown if the chatbot user enters anything and the duration limit given in Timeout(in seconds) has been reached.
- Variable Name: Variable name in which the workflow response will be stored.
- Variable State: The state in which the workflow response will be stored.
Format Output
Format Output can be configured for scenarios where you might want to continue with the conversation right after invoking the AutomationEdge workflow and show the output when the workflow response is received. Regardless of the conversation the chatbot user is in, the workflow response would be shown to the chatbot user in the specified format without disrupting the existing conversation.
The attributes available under the Format Output subtab are explained below,
By default Condition C1 is added. To add more conditions, click the plus ( ![]() ) icon.
) icon.
In the case of multiple conditions, only the first Condition that matches the specified condition will be executed.
In each condition subtab we have the following options,
- Output: The workflow response can be specified as Text or Card.
- Output File Order: Choose between "Before" and "After" to determine the order in which the output files are formatted in relation to the action execution. This feature is useful when you do not want the chatbot to wait for a response from the AutomationEdge workflow but need to show the response (whenever received) to the chatbot user.
If Text is selected,
- Message: Enter the message which needs to be shown to the chatbot user on receiving the workflow response.
If Card is selected,
- Card Type: Select the type of card to show the workflow output.
- Card Data: The JSON data which contains the card contents and format.
The workflow response is in JSON format. To access any attributes from the workflow response JSON, use format ${wf.attribute_name}. The attribute name should match the nesting as well.
For example, the workflow response JSON is as follows,
{
  "success": true,
  "data" : {
    "message": "Request 0001 has been processed successfully."
  }
}
Access the attributes as
- success : ${wf.success}
- message : ${wf.data.message}
These attributes are accessible for conditional formatting as well.